Posts

Showing posts with the label Ubuntu

Fix the login loop in Xubuntu 24.04

 I had some problems logging into my brand new Xubuntu 24.04 LTS install running on Virtualbox. On the first login, I was booted back to the login screen. Opening some apps would also throw me out of the GUI session to the login screen. Eventually, I got into a loop where I get continually thrown into a login screen. This bug is mentioned on the Xubuntu homepage as a known issue: Xorg crashes and the user is logged out after logging in or switching users on some virtual machines  Seems that this bug also affects Ubuntu 24.04 . To get a terminal from the login screen, I pressed Ctrl-Alt-F1 and logged in. To get back to the GUI login, you can press Ctrl-Alt-F7. To fix the problem, I had to remove libva-wayland2: sudo apt remove libva-wayland2  After this, login is possible again in GUI mode (Ctrl-Alt-F7). However, this also uninstalled some apps I wanted. Looks like I have to skip Xubuntu 24.04 or Ubuntu 24.04 for now until this is fixed.

Installing Glances web server to run as a service on Ubuntu Linux

Image
Glances screenshot from the Glances documentation I wanted to have an easy way to monitor how my server is doing. Glances is a software that gives you a good overview of your system. So I decided to install it. I have a headless Ubuntu Linux server machine for random programming and hobby projects. It runs a web server and a couple of other services. With "headless" I mean the server doesn't have a monitor or a desktop environment. I also have Home Assistant installed on a Raspberry Pi 4. I wanted to bring the monitoring data there for easy review. Glances allows one to do that. It provides a web interface for directly checking the status of the machine and an API for Home Assistant to gather status data. Glances installation the Ubuntu way is problematic I first tried to install Glances using the built-in package manager apt. This proved to be a bad idea for two reasons. First off, the Glances version that you will get with apt is outdated. Especially if you have an olde...

Using the backup-manager Linux utility

Here's a quick rundown of a simple backup-manager configuration. In addition to the basic tarballs, I set it up to backup the mysql database. I did not automate the backup process. I will use the configuration to backup stuff manually on a USB drive. I am also not using the upload functionality of backup-manager. These should be relatively easy to set up once you try out the manual process. Installation Installing backup-manager with apt-get is easy: sudo apt-get update sudo apt-get install backup-manager It will ask for some of the configuration. Don't worry about that now, we will change the configuration later. Disable unnecessary cron job (optional) With the following commands I found all the backup-manager files strewn across the system: updatedb locate backup-manager From there, I could see that backup-manager installed a cron job: /etc/cron.monthly/backup-manager-clean-upload-db As I am not using the upload jobs, I disabled that cron job. This should not be necessary. su...

Format a disk on Ubuntu command line

Make sure you have cfdisk installed: sudo apt-get update sudo apt-get install cfdisk Please note: this will erase your disk! Also note: your old data will be still readable after this. The data is not totally destroyed! If you want to make sure the data is destroyed, you have to shred the disk. Connect your drive if it is not connected. See the dmesg command to see which device it was attached to: dmesg This will show you for example messages about "sdd" Then use cfdisk to partition your disk: sudo cfdisk /dev/sdd Use the simple cfdisk interface to: Delete the old partition Make a new partition with type 83 "Linux" Write the partition table Quit After that, you need to create a file system on the disk. sudo mkfs.ext4 /dev/sdd1 This would create partition 1 on the disk /dev/sdd.

A simple iptables config example

Here's my super simple iptables config file. It will accept SSH, HTTP and ping (ICMP) from anyone. Other inward connections will be dropped. Outward connections or connections from the local host are not restricted in any way. *filter :INPUT DROP [0:0] :FORWARD ACCEPT [0:0] :OUTPUT ACCEPT [0:0] -A INPUT -p tcp -m tcp --dport 80 -j ACCEPT -A INPUT -p tcp -m tcp --dport 22 -j ACCEPT -A INPUT -p icmp -j ACCEPT -A INPUT -i lo -j ACCEPT -A INPUT -m state --state RELATED,ESTABLISHED -j ACCEPT -A OUTPUT -j ACCEPT COMMIT In order to have the config automatically load during boot, I recommend the package iptables-persistent. On Ubuntu or Debian you should be able to install iptables-persistent with the command sudo apt-get install iptables-persistent Now you can save your configuration to the persistent iptable rule file /etc/iptables/rules.v4 and load it with the command sudo iptables-restore < /etc/iptables/rules.v4 Note that if you are using fail2ban, you should stop the fail2ban serv...

Silencing lm-sensors alarms

This guide might help you configure your lm-sensors. This example is made using an Intel DH61AG motherboard. After installing lm-sensors on my Ubuntu machine, I had some strange readings and alarms in the sensors output: coretemp-isa-0000 Adapter: ISA adapter Physical id 0:  +37.0°C  (high = +82.0°C, crit = +102.0°C) Core 0:         +30.0°C  (high = +82.0°C, crit = +102.0°C) Core 1:         +31.0°C  (high = +82.0°C, crit = +102.0°C) nct6775-isa-0290 Adapter: ISA adapter Vcore:          +0.74 V  (min =  +0.00 V, max =  +1.74 V) in1:            +1.09 V  (min =  +0.00 V, max =  +0.00 V)  ALARM AVCC:           +3.34 V  (min =  +2.98 V, max =  +3.63 V) +3.3V:      ...

How to fix apt "Cannot initiate the connection" on Ubuntu headless

Today, while updating my Ubuntu headless server, I got some errors from the mirror I was using: sudo apt-get update Err:1 http://fi.archive.ubuntu.com/ubuntu xenial InRelease Cannot initiate the connection to fi.archive.ubuntu.com:80 connect (101: Network is unreachable)  ...and so on. Seems there is some problem with fi.archive.ubuntu.com, or maybe they stopped serving updates for my old LTS version of Ubuntu. This was solved with some editing of /etc/apt/sources.list sudo nano /etc/apt/sources.list I replaced http://fi.archive.ubuntu.com/ubuntu/ with mirror://mirrors.ubuntu.com/mirrors.txt. If you want to be sure, leave the old lines there commented with #, so you can go back if this doesn't help. So the lines would look like this now: deb mirror://mirrors.ubuntu.com/mirrors.txt xenial main restricted  # deb http://fi.archive.ubuntu.com/ubuntu/ xenial main restricted  deb mirror://mirrors.ubuntu.com/mirrors.txt xenial-updates main restricted # deb ...

How to scan with an old HP ScanJet on a Windows 10 machine

Image
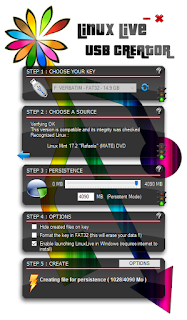
I think it's a sin that HP doesn't support their old scanners on newer Windows machines. This way they end up in landfills and HP can make money selling new ones. I'm running Windows 10 and was unable to use the old HP ScanJet 6300 I have, since there is no TWAIN driver available for it. So I googled around and found a program called VueScan, which implements their own driver for old scanners. It was nice, but the trial version leaves a nasty big watermark. And the cost is crazy. 40€ for simple scanning and 90€ for OCR? A new scanner is cheaper! If a VueScan developer is reading this, I would have gladly paid 5€ for your program, with OCR. I hope you consider re-thinking your prices. So here is a guide how you too can keep your old Scanner working without VueScan. The answer is called Linux, specifically a Live USB stick. It takes about 10-20min to create the stick. You just need an USB thumb drive with some 8 GB of free space. 4 GB should probably work too. 1) Down...

Removing Apache signature "Apache X.X.X running on Ubuntu"

On ubuntu, edit the file /etc/apache2/conf.d/security and modify the lines starting with ServerTokens and ServerSignature so that they look like this: ServerTokens Prod ServerSignature Off

Installing the no-ip.org client in Ubuntu

If you get "no such package" error when trying to install the no-ip client on Ubuntu, follow these instructions (more info at their help site ): cd /usr/local/src wget http://www.no-ip.com/client/linux/noip-duc-linux.tar.gz tar xzf noip-duc-linux.tar.gz cd no-ip-2.1.9 make make install

Script for updating no-ip DDNS from behind the router

no-ip is my favourite dynamic DNS service, and I was saddened by the fact that my new Cisco EPC3825 cable modem didn't support it. I have a Linux server running, so my second option was to use that for updating the IP. All I needed was a script to do it for me, from inside the LAN of my home. Problem is, my server is in a LAN with an internal IP, while I need it to update no-ip.org with the IP address of my cable modem. It was made possible by 1) no-ip - maybe the best free dynamic DNS? 2) ifconfig.me - an AWESOME site for figuring out your IP in linux 3) some scripting skills 4) cron First, have an account at no-ip.org ready, so sign in and create an account if you haven't done it yet. Install curl and wget: apt-get install curl wget Install also the no-ip client (more info at their help site ): cd /usr/local/src wget http://www.no-ip.com/client/linux/noip-duc-linux.tar.gz tar xzf noip-duc-linux.tar.gz cd no-ip-2.1.9 make make install Now...

Upgrading Ubuntu 10.04 to 11.10.

Due to the Kernel of my current Ubuntu Linux being incompatible with the new squashfs, I wanted to update my Ubuntu desktop to the newest version, 11.10. The old version I was using was 10.04 LTS (long-term support). The process had to be done in three parts, and took a quite long time (~3 hours). If you have a slow internet it could take much more. But at least the process was straightforward. First, I upgraded from 10.04 to 10.10 with this guide (quoted below). Upgrade from 10.04 LTS to 10.10 - Network Upgrade for Ubuntu Desktops (Recommended) You can easily upgrade over the network with the following procedure. Open the Software Sources application from the System -> Administration menu Select the sub menu Updates from the Software Sources application Change the Release Upgrade drop down to "Normal Releases" and close the application Press Alt-F2 and type update-manager  Click the Check button to check for new updates. If there are any updates to install...

Octave io package troubles fixed...

I was trying to use the textread function in Octave 3.2, under Ubuntu 10.04. All I got was this error message: error: `textread' undefined near line 5 column 9 I learned from the internet that I need the io package from Octave-forge. So, I downloaded it and tried to install it from Octave with this command: pkg install  io-1.0.14.tar.gz Unfortunately, that also gave an error message: Error: the following dependencies where unsatisfied: io needs octave 3.4.0 So, I found out the io-1.0.13 package is compatible with Octave 3.2. The older versions can be found from the Octave-forge directory tree. I downloaded that version and tried to install it with this Octave command: pkg install  io-1.0.13.tar.gz Still an error message.  make: mkoctfile: Command not found make: *** [textread.oct] Error 127 'make' returned the following error: make: Entering directory `/tmp/oct-TJBAXw/io/src' mkoctfile textread.cc make: Leaving directory `/tmp/oct-TJBAXw/io/src'...