Posts

Showing posts from 2020

Exporting to a CMYK color profile with GIMP on Windows 10

Recently I had to export some image for CMYK printing. The print house was requesting a certain FOGRA color profile. I don't have any Adobe licenses and am doing all the image work on GIMP, so I had to do a bit of research. Googling around, I found two options to export images. A plugin called "Separate" and another plugin called Cyan . It looked like Separate is not maintained anymore , so Cyan was my choice. Here's how to do it: Download Cyan, Run Cyan once and select some profiles as "default" profiles. I'm a bit unsure why you need to do this, but this is how it works for some reason. Restart GIMP and you should see the Cyan drop down in the file menu. From there, you can select to export any file you've opened with GIMP. Close Cyan and browse to this location with Windows File Explorer: C:\Users\<YOUR USERNAME>\.config\Cyan\icc Copy any .icc color profile files you want to use to that folder. Now you can select those new profiles the next...
How to remove Your Phone, People, Get Help and other useless apps from Windows 10

Image
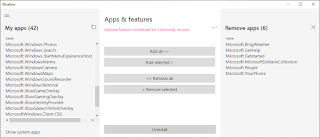
 I recently came across a great piece of open source software: Bloatbox . It allows you to remove unwanted bloatware that came with the Windows 10 installation. For some weird reason these cannot be uninstalled through the windows apps catalog. But now there is a cure for that. Download bloatbox from it's github page and run the .exe file. Then select the apps you want to remove and click Uninstall.   Here are some recommendations to remove: Microsoft.BingWeather Microsoft.GetHelp Microsoft.GetStarted Microsoft.MicrosoftSolitaireCollection Microsoft.People Microsoft.YourPhone

Lenovo ThinkPad PowerMgr.exe error 0x0000007E

Image
Suddenly, I started getting this error on a Lenovo ThinkPad, with Windows 10 64-bit: PowerMgr.exe 0x0000007E The specified module could not be found. Open Device Manager by pressing Windows button and typing "device manager" and hitting enter. Locate System Devices, and Lenovo Power Manager from there. Right-click and Select Uninstall Device. Select to Delete device driver and click OK. Then click on Action, Scan for hardware changes. The Lenovo Power Manager device will reappear. Reboot your PC. The problem should be fixed now!

Windows update KB4565351 fails with error 0x800706be

I have a problem with Windows Update. An update fails every time, causing the computer to be locked out of new updates.  The problem is with update KB4565351. I'm using 64-bit Windows 10 version 1909, running on a ThinkPad X201 laptop. The update fails with error code 0x800706be. First try: Running Troubleshooter for Windows Update First I tried the troubleshooter for Windows Update. Like I expected, it did not find any problems. Oh, well. Second try: Resetting Windows update Next up, I tried this solution to reset Windows update: https://appuals.com/fix-windows-10-update-error-0x800706be/ It did not help. I still got the same error.  I also found another, slightly different solution for resetting the Windows Update. Third try: downloading the update manually from Microsoft Update Catalog Then, I tried downloading the KB4565351 manually from the Microsoft Update Catalog. I got the version for x64 Windows 10 1909. After downloading, I ran the package by double clicking on it. ...

Upgrading Ubuntu Server 16.04 LTS to 18.04 LTS

Here's a diary of my experience updating Ubuntu Server, on command line, with no desktop environment. Starting the upgrade This is the easy part... sudo apt update sudo apt upgrade sudo apt dist-upgrade sudo apt install update-manager-core sudo do-release-upgrade Considerations when upgrading through SSH Since I'm upgrading through SSH, I got this message: Continue running under SSH? This session appears to be running under ssh. It is not recommended to perform a upgrade over ssh currently because in case of failure it is harder to recover. If you continue, an additional ssh daemon will be started at port '1022'. Do you want to continue? Continue [yN] y Starting additional sshd To make recovery in case of failure easier, an additional sshd will be started on port '1022'. If anything goes wrong with the running ssh you can still connect to the additional one. If you run a firewall, you may need to temporarily open this port. As this is potentially dangerous it...

Change IP address using a batch script in Windows 10

Here's how to quickly change your IP address with a batch script in Windows. First, check the output of the "ipconfig" command. The command will print names of your network interfaces and their settings. Then, if your ethernet adapter is called "Ethernet", you can set it to DHCP with the following batch script: netsh interface ipv4 set address name="Ethernet" dhcp netsh interface ipv4 set dns name="Ethernet" dhcp pause If you create a .bat file from that and run it as administrator , your network settings will change to automatic (DHCP). Other useful netsh examples: Set your IP to 192.168.1.120 and subnet mask to 255.255.255.0 netsh interface ipv4 set address name="Ethernet" static 192.168.1.120 255.255.255.0 Set gateway address to be 192.168.1.1 netsh interface ipv4 set address name="Ethernet" gateway=192.168.1.1 Remove DNS server settings netsh interface ipv4 delete dnsserver name="Ethernet" all

How to remove extra items from the 'new' context menu in Windows 10

If you haven't cleaned it up yourself, chances are there are several useless and annoying items in the right-click "New" context menu. People rarely create Rich Text Documents for example. And I never create new LibreOffice document files with the right-click menu. Instead, I open LibreOffice and then do what I need. So here's how to get rid of some of these extra options in your Windows 10 right-click context menu. Remove New 'Avisynth Script' option The file extension is avs. With regedit, go to: Computer\HKEY_CLASSES_ROOT\.avs Delete the ShellNew folder. Remove New 'Rich Text Document' The file extension is rtf. Remove folder Computer\HKEY_CLASSES_ROOT\.rtf\ShellNew Remove New 'Bitmap image' The file extension is bmp. Remove folder Computer\HKEY_CLASSES_ROOT\.bmp\ShellNew Remove New 'OpenDocument Text' The file extension is odt. Remove folder: Computer\HKEY_CLASSES_ROOT\.odt\LibreOffice.WriterDocument.1\ShellNew Remove New 'OpenD...

How to fix the weird audio bug in Kingdom Come: Deliverance

Image
  Kingdom Come: Deliverance has a bug which makes the sound come out muffled or like the characters were talking far away or through a tunnel. This seems to be because the game thinks you are using multichannel surround sound. There seems to be no option to change the audio mode in-game. Instead, you should change your audio settings in Windows by following these directions: Press the windows key Type "Choose your output device" and select the search result. Select "Device properties" under the Output caption. Select "Additional device properties" This dialog will differ depending on your audio hardware. Go to the Advanced tab. There should be a selection for the default audio format. You should select something like this: 2 channel 44100 Hz audio. I had my Focusrite audio interface set up with 8 channels 24bit 44100 Hz, and that caused Kingdom Come to think I have surround sound. After changing the channel amount to 2 the audio started working correctly.

Using the backup-manager Linux utility

Here's a quick rundown of a simple backup-manager configuration. In addition to the basic tarballs, I set it up to backup the mysql database. I did not automate the backup process. I will use the configuration to backup stuff manually on a USB drive. I am also not using the upload functionality of backup-manager. These should be relatively easy to set up once you try out the manual process. Installation Installing backup-manager with apt-get is easy: sudo apt-get update sudo apt-get install backup-manager It will ask for some of the configuration. Don't worry about that now, we will change the configuration later. Disable unnecessary cron job (optional) With the following commands I found all the backup-manager files strewn across the system: updatedb locate backup-manager From there, I could see that backup-manager installed a cron job: /etc/cron.monthly/backup-manager-clean-upload-db As I am not using the upload jobs, I disabled that cron job. This should not be necessary. su...

Format a disk on Ubuntu command line

Make sure you have cfdisk installed: sudo apt-get update sudo apt-get install cfdisk Please note: this will erase your disk! Also note: your old data will be still readable after this. The data is not totally destroyed! If you want to make sure the data is destroyed, you have to shred the disk. Connect your drive if it is not connected. See the dmesg command to see which device it was attached to: dmesg This will show you for example messages about "sdd" Then use cfdisk to partition your disk: sudo cfdisk /dev/sdd Use the simple cfdisk interface to: Delete the old partition Make a new partition with type 83 "Linux" Write the partition table Quit After that, you need to create a file system on the disk. sudo mkfs.ext4 /dev/sdd1 This would create partition 1 on the disk /dev/sdd.

A simple iptables config example

Here's my super simple iptables config file. It will accept SSH, HTTP and ping (ICMP) from anyone. Other inward connections will be dropped. Outward connections or connections from the local host are not restricted in any way. *filter :INPUT DROP [0:0] :FORWARD ACCEPT [0:0] :OUTPUT ACCEPT [0:0] -A INPUT -p tcp -m tcp --dport 80 -j ACCEPT -A INPUT -p tcp -m tcp --dport 22 -j ACCEPT -A INPUT -p icmp -j ACCEPT -A INPUT -i lo -j ACCEPT -A INPUT -m state --state RELATED,ESTABLISHED -j ACCEPT -A OUTPUT -j ACCEPT COMMIT In order to have the config automatically load during boot, I recommend the package iptables-persistent. On Ubuntu or Debian you should be able to install iptables-persistent with the command sudo apt-get install iptables-persistent Now you can save your configuration to the persistent iptable rule file /etc/iptables/rules.v4 and load it with the command sudo iptables-restore < /etc/iptables/rules.v4 Note that if you are using fail2ban, you should stop the fail2ban serv...

Silencing lm-sensors alarms

This guide might help you configure your lm-sensors. This example is made using an Intel DH61AG motherboard. After installing lm-sensors on my Ubuntu machine, I had some strange readings and alarms in the sensors output: coretemp-isa-0000 Adapter: ISA adapter Physical id 0:  +37.0°C  (high = +82.0°C, crit = +102.0°C) Core 0:         +30.0°C  (high = +82.0°C, crit = +102.0°C) Core 1:         +31.0°C  (high = +82.0°C, crit = +102.0°C) nct6775-isa-0290 Adapter: ISA adapter Vcore:          +0.74 V  (min =  +0.00 V, max =  +1.74 V) in1:            +1.09 V  (min =  +0.00 V, max =  +0.00 V)  ALARM AVCC:           +3.34 V  (min =  +2.98 V, max =  +3.63 V) +3.3V:      ...

Full list of keyboard shortcuts for Windows Terminal

I already wrote a post about tips on using the new Windows Terminal app . Going further, here is the current full list of keyboard shortcuts for this great tool. These are the defaults when you install the app. All of these shortcuts can be changed in your personal settings file. This list can be found in the default settings file in the official Github repository . Check that out if you want the most up to date info. I was originally looking for a "select all" function, but sadly that has not been implemented. But it seems they are working on it . Here is the full list: // Application-level Keys { "command": "closeWindow", "keys": "alt+f4" }, { "command": "toggleFullscreen", "keys": "alt+enter" }, { "command": "toggleFullscreen", "keys": "f11" }, { "command": "openNewTabDropdown", "keys": "ctrl+shift+space" }, { ...

How to use the new Windows Terminal

The new Windows Terminal is awesome! If you are a frequent command line user I highly recommend you to try it. However, the user documentation could be better. Here's a few tips for beginners: How to start Windows Terminal from command line? Simply type wt to open Windows Terminal. If you want to open it in the current folder, try this: wt -d . How to start a batch script file in Windows terminal? start wt -d . cmd.exe /C my_batch_file.bat or, you could create a shortcut, edit it's properties and set the target to be: wt -d . cmd.exe /C my_batch_file.bat How to search for text in the Windows Terminal window? Press ctrl+shift+f to search. How to copy text from the Windows Terminal to clipboard? Left-click and drag to select some text. Then right-click the terminal window. How to paste text from clipboard to the Windows Terminal? Right-click the terminal window. More reading Here is the full list of default keybindings for Windows Terminal . Some more keyboard shortcuts are ex...

How to fix the Anno 1404 out of memory error

While playing Anno 1404 Venice multiplayer in local LAN , I had some crashes on one of the PCs. The game suddenly shows a message saying "You no longer have enough memory" and then crashes after a while. I found several tips on the internet on how to solve this. But for me, this is what worked: 1) Download this tool called 4GB Patch and run it on these four .exe files: \Anno 1404 Gold Edition\Addon.exe \Anno 1404 Gold Edition\Anno4.exe \Anno 1404 Gold Edition\tools\AddonWeb.exe \Anno 1404 Gold Edition\tools\Anno4Web.exe 2) Reduce graphics quality to medium or low. This allowed us to play long sessions and I never saw the error again. I don't mind the graphics being a bit crappy if works better. If you're looking for help on how to play Anno 1404 in the local network, check this guide !

How to play Anno 1404 multiplayer in local area network

Image
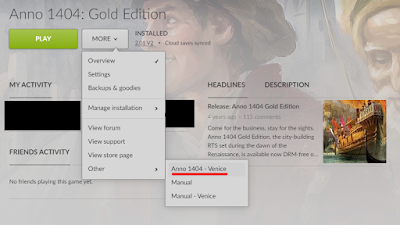
Not long ago, I bought Anno 1404 Gold Edition on discount from gog.com for about 4€. I have enjoyed playing it in local LAN. But getting there was a bit tricky, and here is a guide for others who want to do the same. 1) You need the Venice expansion pack for Anno 1404. The base game doesn't have a multiplayer feature. The Gold Edition contains both Anno 1404 and the Venice expansion. 2) You only need to buy one copy of Anno 1404 and Venice expansion to play in the local area network. 3) Starting the game, you should make sure to start Anno 1404 Venice, and not Anno 1404. There is no multiplayer option to select in Anno 1404. Here's a screenshot of how to start Anno 1404 Venice via GOG Galaxy: Don't press the big green button! You can also open start menu and type "Venice" to find the shortcut to Anno 1404 Venice. 4) You should create the game session on the most powerful PC you have. This is also the computer you should save the game on. We'l...

Removing unnecessary software from a new Windows 10 install

Here's a list of programs I recommend removing from a clean Windows 10 install. Click on start menu, Settings, Apps, and from the list, select what you want and Uninstall. What you should remove depends on what you need. There are also better programs out there to replace some of these. Commonly unnecessary software to remove: 3D Builder 3D Viewer Feedback Hub Groove Music Mixed Reality Portal Mobile Plans Movies & TV OneDrive OneNote Print 3D Xbox Live Xbox Console Companion A clean install of Windows 10 will have shortcuts for the various Microsoft Office apps, such as Access, Excel, PowerPoint, Publisher, Outlook and Word. But if you don't have an Office license and are not planning on getting one, these are just taking up space. And you can always get the LibreOffice suite for free. In order to remove them, remove also the following programs: Office Microsoft Office 365 - da-dk Microsoft Office 365 - en-us ...and all of the other Office 365 ...

Fight Coronavirus using spare computing power

Image
Rosetta@Home calculating... There are a couple of options to make your PC join the fight against Coronavirus: 1. Folding@Home has seen the most news coverage so far. Maybe you've heard about it. You can easily start by downloading the Folding@Home client. 2. Rosetta@Home is another project that is calculating possible cures to the disease. This one seems to have gotten much less media attention. You can start here . Both of these projects have been around a long time before the Coronavirus, researching cures for a list of other diseases like HIV, Ebola, Zika, Alzheimer's, Huntington's, etc. Folding@Home has maybe the easier user interface. For non-technical users it might be the better choice. Rosetta@Home uses BOINC , which has more features and allows you to specifically define the conditions for using your computing power. For the more technical ones I recommend Rosetta. You can also earn a little pocket money from calculating Rosetta@Home tasks. A cr...

Change the default directory of Git Bash in Windows

Image
By default, Git Bash on Windows will open in your user folder. In order to change this to another folder, you need edit two things in the Git Bash shortcut: 1. Remove the --cd-to-home from Target field. 2. Change "Start In" field to be the path to your desired startup folder. If you want to edit the shortcut in your start menu, select "Open file location": And then right-click the Git Bash shortcut in the folder that opens, and select Properties.